
Adding PowerShell code quality gates in VSTS using the PSCodeHealth extension
Introducing the PSCodeHealth VSTS Extension
We have already taken a detailed look at PSCodeHealth and how we can really unleash its usefulness in a release pipeline.
So if you care about coding standards and/or quality of your PowerShell code and you use Visual Studio Team Services to build/release your PowerShell projects, you will probably be interested in the PSCodeHealth VSTS extension.
The extension provides a Build/Release task to gather PowerShell code quality metrics. This task also allows to define (and optionally enforce) quality gates based on these code metrics.
If you already use the PSCodeHealth PowerShell module, the VSTS extension doesn’t really add anything new in terms of functionality.
What it does bring to the table is : ease of use and seamless integration with VSTS.
Installing the Extension in VSTS
- Browse to the extension page in the Visual Studio marketplace
- Click on the “Get it free” button
- Select your VSTS account
- If you are an admin of the VSTS account :
- Click “Install”
- After a few seconds, you should see a message telling that you are all set
- If you are not an admin of the VSTS account :
- Click “Request”
- The extension will be added automatically as soon as the request is approved
Once added to your VSTS account, the PSCodeHealth task will be available for :
- Build definitions
- Release definitions
Using the Task in a Build Definition
To illustrate the usage of the PSCodeHealth task, we’ll create a brand new build definition for the following GitHub repository : PSGithubSearch.
Creating a new build definition
- In the “Builds” hub, click on “New”
- In the “Select your repository” page, select :
- “GitHub” if you have a GitHub service endpoint to access the repo
- “VSTS Git” if you have imported the repo to the VSTS “Code” hub using the clone URL
- Set the default branch to “master”
- In the “Choose a template” page, click on “Empty process”
- In the “Process” tab, we’ll use
PSGithubSearch-CIhere - Choose an Agent queue :
- For hosted agents, use “Hosted VS2017”, because it has PowerShell 5.1 and even
Pesteris pre-installed (albeit an old version) - For private agents, ensure they have PowerShell 5.x. If they don’t have
Pester, you can either install it permanently or use a build task to always get the latest version
- For hosted agents, use “Hosted VS2017”, because it has PowerShell 5.1 and even
- In the “Phase 1” tab, you might want to change the phase display name to something meaningful
Adding the PSCodeHealth task to the build definition
- In the “Phase” tab, click on the “Plus” button
- Type
PSCodeHealth - Click on “Add” to add the task
- Click on the task name (“PowerShell Code Analysis” by default) to get to the task configuration
Configuring the task
Specifying the paths of PowerShell code and tests
The field labeled “Path to Analyze” allows you to specify the location of the PowerShell files (.ps1, .psm1 and .psd1) to analyze. This is a path relative to the root of the repository.
The easy and recommended way of filling out this path is to click the ellipsis button on the right, to browse the files and folders in the repository.

If “Path to Analyze” is a folder, which is the case here, the checkbox “Search PowerShell files in subdirectories” allows to analyze PowerShell code in subfolders, recursively.
The field labeled “Pester Tests Path” allows to specify the location of the tests, which are going to be executed by Pester. Again, I would recommended to click the ellipsis button to browse the files and folders in the repo.
In this case, we chose the Tests/Unit subfolder, which contains all the unit tests.
Generating an HTML report
You may opt to generate an HTML report by checking the following checkbox :

This enables the field labeled “HTML report path” to specify the path and file name of the report. Here, we save the file in the artifacts staging directory, in case we want to publish it as an artifact.
Selecting specific code metrics
The quality gate compares actual code metrics of the analyzed PowerShell code with compliance rules for these metrics.
If 1 or more evaluated code metric(s) doesn’t meet its compliance rule, the analyzed code doesn’t meet the quality gate.
By default, the task will evaluate all code metrics against their respective compliance rules.
If you only care about specific metrics, you can specify which ones by checking the box labeled “Select metrics to evaluate”.
This enables additional checkboxes to choose which metrics to evaluate for compliance.

The label for each checkbox should hopefully be self-explanatory.
For more information on the metrics, how they are measured, their meaning, their purpose, please refer to this documentation page.
In this case, we unselected the total number of PSScriptAnalyzer findings, as we deemed the average more relevant than the total.
Speaking of PSScriptAnalyzer, there is no need to install it since it is shipped with the extension.
Overriding the default compliance rules
PSCodeHealth comes with default compliance rules which determine, for their respective code metric, whether the analyzed code passes or fails.
These default rules can be overridden for some (or all) of the code metrics, so you can define the quality gate to suit your requirements or goals.
The field labeled “Override compliance rules with a custom settings file” allows to specify the JSON file where custom compliance rules are defined.
Click the ellipsis button to look for the file in the repository.

Here, we specified a file named ProjectRules.json at the root of the repository. This file defines compliance rules for 2 metrics :
- LinesOfCodeAverage : much higher warning and fail thresholds than the default, because the functions in this project are a bit monolithic and we are OK with that for now.
- TestCoverage : slightly more permissive than the default, because some of this code is difficult to unit test (but may very well be covered by integration tests).
Here is what this looks like :
{
    "PerFunctionMetrics": [],
    "OverallMetrics": [
        {
            "LinesOfCodeAverage": {
                "WarningThreshold": 115,
                "FailThreshold": 165,
                "HigherIsBetter": false
            }
        },
        {
            "TestCoverage": {
                "WarningThreshold": 75,
                "FailThreshold": 65,
                "HigherIsBetter": true
            }
        }
    ]
}
For more information on compliance rules, their warning and fail thresholds and how to customize them, please refer to this documentation page.
Running the build
Now, we are done with the task configuration. We can save the build definition and a queue a new build.
When the task is running, the PSCodeHealth module analyzes the PowerShell files found in the specified path, generates code metrics, runs any tests file(s) using Pester and creates a [PSCodeHealth.Overall.HealthReport] object.
Then, the metrics values in the report are evaluated for compliance, based on their respective rules (rules from the JSON file override the defaults).
Here is the build console output we got :
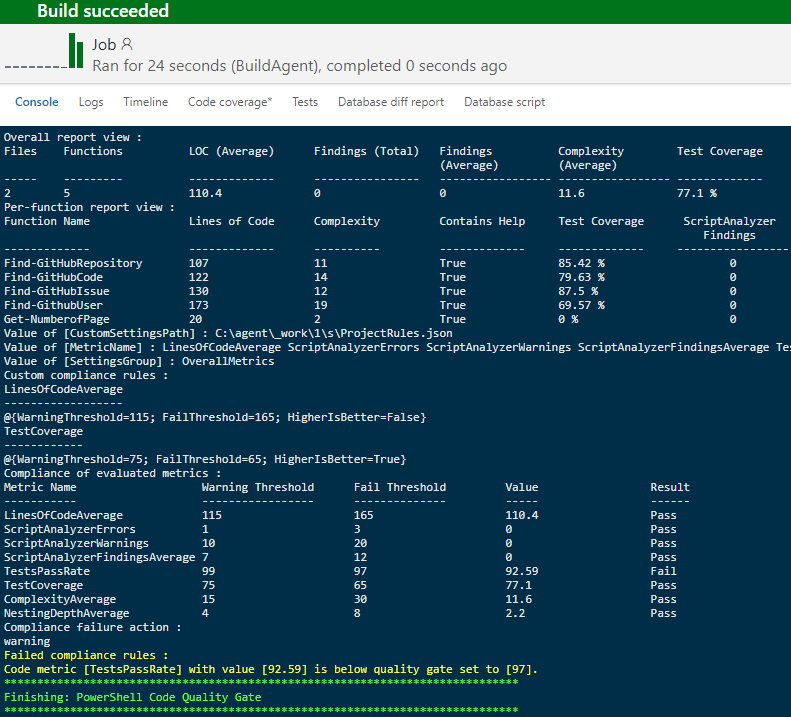
This output provides :
- Overall view of the
PSCodeHealthreport - Report broken down by function
- Some variables values based on the task configuration (for instance, we get the user-defined compliance rules from the specified JSON file)
- Compliance result for each evaluated metric
- Task result
As seen in the screenshot, the analyzed code didn’t meet our quality gate because 1 metric failed compliance.
Despite this compliance failure, the build was successful. This is because the default compliance failure action is to just log a warning for each rule which failed compliance.
Notice that the failing metric was TestsPassRate, which means that some unit tests have failed. Failing tests are a serious matter so we certainly want to fail the build whenever this occurs.
In other words, we want to enforce our quality gate.
Enforcing the Quality Gate
To choose whether (and how) to enforce our lovingly crafted quality gate, we use the field “Action to take in case of compliance failure(s)” :
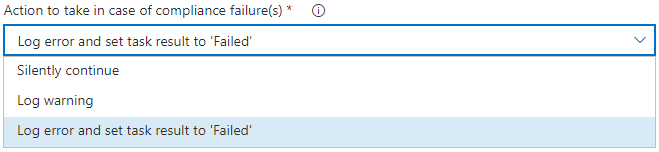
Here is an explanation of each possible choice in this dropdown :
- Silently continue : no action is taken
- Log warning : a warning is logged for each metric failing compliance
- Log error and set task result to ‘Failed’ :
- a warning is logged for each failing metric
- an error is logged with the names of metrics failing compliance
- the task result is set to ‘Failed’, which also sets the overall build result to ‘Failed’
So let’s choose the last one to ensure the build fails whenever the code does not meet the quality gate.
Then we save the build definition and queue a new build.
Here is the output of this new build :
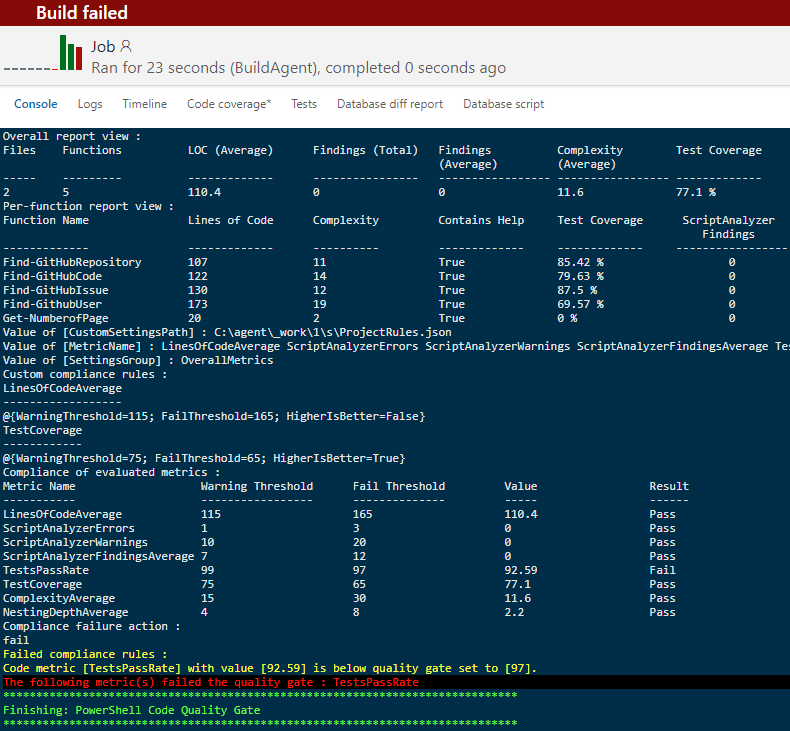
As expected, in addition to the warning, we get an error telling us which metric(s) failed compliance.
Also, the task result is set to “Failed”, which in turn, sets the overall build status to “Failed”.
Conclusion
I believe that making the build fail is crucial for a quality gate, because a build failure should trigger 2 fundamental practices of Continuous Integration :
- The CI system notifies the dev who made the code change and/or the team
- Addressing the issue(s) surfaced by a failing build is the priority #1
Keep in mind that there is no shame in breaking the build. A build failure is not a failure, it is feedback. Specific, timely, actionable feedback, to facilitate the development process.
I do hope that the PSCodeHealth VSTS extension can bring this kind of benefits, and help you build awesome PowerShell projects.
Naturally, this extension is open source and available on GitHub.
In addition, it may serve as an interesting example, in case you are curious about how to author a VSTS extension using the PowerShell SDK.

Leave a Comment
Your email address will not be published. Required fields are marked *