
Triggering the removal of machines from Octopus Deploy on Azure VM deletion
The Use Case
Let’s say we use Octopus Deploy to standardize our software deployments across many environments.
These environments, especially the ones used for development, CI/CD, or QA purposes greatly benefit from being managed as transient cattle (as opposed to pets).
In a cattle mindset, we spin up environments only when they are needed and tear them down as soon as they are not needed.
Coupled with automation, this provides speed, consistency, self-service and cost control. Even more so if we leverage cloud resources.
When spinning up environments in Azure, the provisioning of Octopus deployment targets (including registration of Octopus tentacles with the server) can be fully automated with ARM templates and the Tentacle Azure VM extension.
This is nice, but the journey from pet environments to cattle requires the ability to kill our cattle in a quick and painless way. The deletion of resources from Azure is easy to automate but :
What about the removal of Octopus deployment targets from the server ?
The Octopus Tentacle Azure VM extension can register the tentacle with the Octopus server, but not unregister it. There is no off-the-shelf solution to automatically trigger the removal of an Octopus machine (i.e. deployment target) when the VM is deleted from Azure.
So in this article, we’ll look at how to do that, by leveraging 2 powerful Azure services :
- Azure Automation : SASS offering to run and manage scripts, workflows and configurations
- Azure Event Grid : enables apps, Azure services, and 3rd-party services to emit, route and react to events
Runbook To Remove a Machine From an Octopus Server
First, we need an Azure Automation account.
Creating an Automation account is straightforward, as explained in this documentation page.
Importing the Octoposh PowerShell module Into our Automation Account
To send commands to our Octopus server, we could write our own calls to the Octopus REST API, but why reinvent the wheel when we can use the excellent Octoposh module right from Azure Automation ?
To import the module in our Automation account, select Modules and click on Browse Gallery. This provides access all the modules from the PowerShell Gallery.
Search for Octoposh, select the search result and then, click on Import and OK.
Adding Variables to Connect to our Octopus Server
Our runbook will need to connect to the Octopus server. This requires 2 pieces of information :
- The server URL
- An Octopus API key (for authentication/authorization)
We’ll store these 2 values as variables in our Automation account so that the runbook can easily and securely access them.
Select Variables and click on Add a variable.
Create the following variables :
- The server URL :
- Name : OctopusURL
- Type : String
- Value : the URL of our Octopus Deploy server
- Encrypted : No
- Octopus API key :
- Name : OctopusAPIKey
- Type : String
- Value : API key from an account which has MachineDelete permission (preferably a service account)
- Encrypted : Yes
We are now ready to create the runbook used to remove machines from Octopus.
Creating The Runbook To Remove a Machine From Octopus
Within our Automation account, select Runbooks and click on Add a Runbook.
In this case, we name the runbook Remove-MachineFromOctopusServer and the runbook type is PowerShell.
As soon as the runbook is created, the Azure portal should switch to the runbook editor.
Our runbook will contain the following code :
Param(
    [Parameter(Mandatory)]
    [string]$MachineName,

    [Parameter(Mandatory = $False)]
    [string]$OctopusURL = (Get-AutomationVariable -Name 'OctopusURL'),

    [Parameter(Mandatory = $False)]
    [string]$OctopusAPIKey = (Get-AutomationVariable -Name 'OctopusAPIKey')
)

"Machine Name : $MachineName"
"Octopus Server URL : $OctopusURL"

Import-Module -Name 'OctoPosh' -Force
Set-OctopusConnectionInfo -URL $OctopusURL -APIKey $OctopusAPIKey | Out-Null

$OctopusMachine = Get-OctopusMachine -MachineName $MachineName
If ( $OctopusMachine ) {
    $OctopusMachine.Resource
    $Result = Remove-OctopusResource -Resource $OctopusMachine.Resource
    If ( $Result -eq $True ) {
        'The machine has been successfully removed from Octopus.'
    }
    Else {
        $ResultString = $Result | Out-String
        Write-Error $ResultString
    }
}
The runbook’s parameters deserve some explanation :
$MachineName: Value passed from another runbook (more on that later)$OctopusURL: Value read from theOctopusURLAutomation variable we created earlier$OctopusAPIKey: Value read from theOctopusAPIKeyAutomation variable
Because we imported the Octoposh module into our Automation account, its cmdlets are readily available when we write runbooks. Here, the module is imported explicitly, but this is only a preference of mine, we could just use PowerShell module auto-loading.
Set-OctopusConnectionInfo is a cmdlet which comes from Octoposh.
The command is piped to Out-Null to avoid, ahem, having the API key exposed in plain text in the output.
Get-OctopusMachine is used to query the Octopus server for the machine (by name).
If the machine is present in Octopus, we use Remove-OctopusResource (another Octoposh cmdlet) to remove it.
Runbook To Be Triggered on Azure Resource Deletion
Creating The “Listener” Runbook
Now, we create a second runbook, the purpose of which is to listen to Azure resource deletion events.
We name this runbook Watch-VMDeletion and the runbook type is PowerShell.
This runbook will contain the following code :
Param(
    [Object]$WebhookData
)

$RequestBody = $WebhookData.RequestBody | ConvertFrom-Json
$Data = $RequestBody.data

# No point in proceeding if the operation is not a VM deletion
If ( $Data.operationName -ne 'Microsoft.Compute/virtualMachines/delete' ) {
    return
}

$PropertiesToLog = @('correlationId','resourceProvider','resourceUri','operationName','status','subscriptionId')
$WebhookDataToLog = $Data | Select-Object -Property $PropertiesToLog
$WebhookDataToLog

$Resources = $Data.resourceUri.Split('/')
$VMName = $Resources[8].Trim()
"VMName from webhook data : $VMName"

If ( $Data.status -eq 'Succeeded') {
    'Invoking runbook : Remove-MachineFromOctopusServer'
    .\Remove-MachineFromOctopusServer.ps1 -MachineName $VMName
}
Else {
    'Deletion event did not succeed, skipping the removal from Octopus server'
}
The value of the $WebhookData parameter is automagically populated by the webhook triggering it.
In turn, the webhook data is passed from the event which has triggered the webhook. This gives us access to rich information about the event and the deleted resource.
This runbook will be triggered every time an Azure resource is deleted, regardless of the resource type. This is because the event subscription filters are a bit limited.
I opened this suggestion on the Azure Event Grid Uservoice about this limitation.
So, we perform the filtering within this runbook :
- We check the value of the
operationNameproperty from the webhook data - If the operation was not on a
virtualMachinesresource, we are done - If it was, we proceed
Then, we do a bit of string manipulation on a the resourceUri value to extract the name of the VM.
Getting the name of VM is crucial because we have to pass it to the Remove-MachineFromOctopusServer runbook.
As seen in the above code, calling a PowerShell runbook from another PowerShell runbook is easy. As long as the called runbook lives in the same Automation account, it can be invoked just like a script which would be in the current directory.
We pass the VM name extracted from the webhook data to Remove-MachineFromOctopusServer via its $MachineName parameter. Remember, it is a mandatory parameter.
This other runbook takes care of the rest : the Octopus-related work.
Adding a Webhook To The “Listener” Runbook
The purpose of the Watch-VMDeletion runbook is to react to events. To enable this, the runbook will be triggered via webhook.
So let’s add a webhook to this runbook :
- Select the
Watch-VMDeletionrunbook - Click on Webhook
- Click on Create new webhook
- Name it WatchVMDeletion (or whatever makes sense to you)
- Set a sensible expiry date (the maximum lifetime is 10 years)
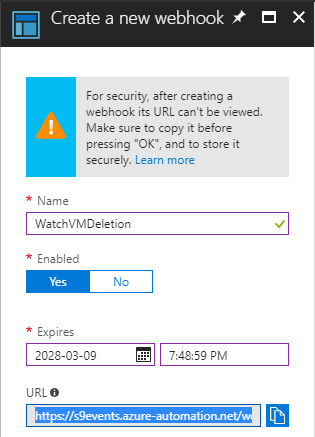
- The webhook URL is needed for later, so make sure to copy it somewhere safe (unless you can remember a 46-character token)
- Click on Configure parameters and run settings
- Leave the default webhook data blank, just click on OK
- Click on Create
With this webhook, we now have an automated way of triggering our runbook, but at this point, the webhook doesn’t know anything about resource deletion events … yet.
To remediate this, we are going to add an event subscription to our Automation account, and configure it so that it routes events to the webhook we just created.
Adding an Event Subscription
The webhook is just a relatively dumb event handler, the main glue between Azure Automation and Azure Event Grid is an event subscription.
So we need to add an event subscription to our Automation account :
- In our Automation account blade, select Event Grid
- Click on the + Event Subscription button
- Select the subscription where the cattle VMs will live (and die)
- Give the event subscription a meaningful name, like OctoVMDeletion
- For topic type, select Azure Subscriptions (if the VMs will only ever be in 1 specific resource group, we could select Resource Groups instead)
- Clear the Subscribe to all event types checkbox
- Select only the Resource Delete Success event type, since we are only interested in deletions
- For Subscriber type, choose Web Hook
- In Subscriber Endpoint, paste the webhook URL copied during the webhook creation
It should look like this :
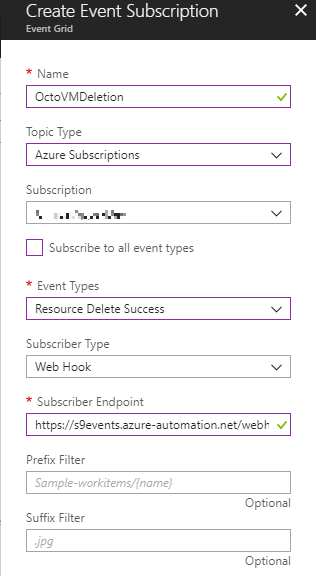
- Click Create
Update :
Last time I checked, the Azure Subscriptions topic type was not visible in the Azure Portal anymore.
Fortunately, we can still use PowerShell to create this event subscription.
Here is how :
Select-AzureRmSubscription -SubscriptionId $TargetSubscriptionId
$EventGridSubParams = @{
    EventSubscriptionName = 'OctoVMDeletion'
    EndpointType = 'webhook'
    Endpoint = $WebhookUrlFromWebhookCreationStep
    IncludedEventType = 'Microsoft.Resources.ResourceDeleteSuccess'
}
New-AzureRmEventGridSubscription @EventGridSubParams
Now, all the pieces are in place, we can delete deployment targets from Azure and watch them magically disappear from our Octopus Deploy server.
Testing The Trigger And Runbooks
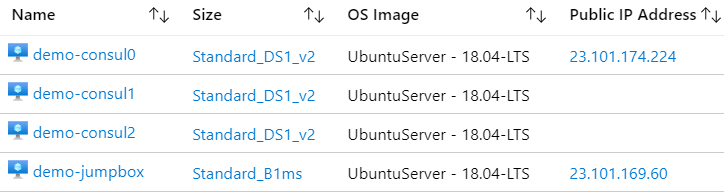
We have a VM living in the Azure subscription specified in the Event Grid subscription. It is named CattleVM01, which is a pretty name for a cattle (not for a pet).
This VM is also a deployment target in our Octopus server :

Let’s delete this VM from Azure (or the resource group containing the VM) and see what happens.
As soon as the VM deletion completes, we can go back to our event subscription and click Metrics. Hovering over the time of deletion shows that there was indeed an event published, and delivered to a handler :

Now, let’s go to the Watch-VMDeletion runbook, click on Jobs and select the latest one.
By clicking on Input, we can view the webhook data, which contains all information about the event.
By clicking on Output, we can view the runbook output, which looks like this :
correlationId    : 9610978a-5b35-40c5-8cac-e1f2814ffaee
resourceProvider : Microsoft.Compute
resourceUri      : /subscriptions/08d7f375-8b5e-4f22-afa7-8f09d060bc11/resourcegroups/CattleVM01/providers/Microsoft.Compute/virtualMachines/CattleVM01
operationName    : Microsoft.Compute/virtualMachines/delete
status           : Succeeded
subscriptionId   : 08d7f375-8b5e-4f22-afa7-8f09d060bc11

VMName from webhook data : CattleVM01

Invoking runbook : Remove-MachineFromOctopusServer

Machine Name : CattleVM01

Octopus Server URL : https://xxxxxxx.xxxxxxxxxx.com

Name                            : CattleVM01
Thumbprint                      : 287CBDB08B9D3790B96EA1F945260F52026D3939
Uri                             :
IsDisabled                      : False
EnvironmentIds                  : {Environments-141}
Roles                           : {App, Core-API}
MachinePolicyId                 : MachinePolicies-1
TenantedDeploymentParticipation : Untenanted
TenantIds                       : {}
TenantTags                      : {}
Status                          : Online
HealthStatus                    : Healthy
HasLatestCalamari               : True
StatusSummary                   : Octopus was able to successfully establish a connection with this machine on Sunday, March 11, 2018 8:37 PM
IsInProcess                     : False
Endpoint                        : Octopus.Client.Model.Endpoints.PollingTentacleEndpointResource
Id                              : Machines-383
LastModifiedOn                  :
LastModifiedBy                  :
Links                           : {[Self, /api/machines/Machines-383], [Connection, /api/machines/Machines-383/connection], [TasksTemplate, /api/machines/Machines-383/tasks{?skip}]}

The machine has been successfully removed from Octopus.
We can go back the Octopus Deploy web portal and confirm that the deployment target CattleVM01 is gone.
Now, development teams and QA folks can spin up and tear down environments to their heart’s content, without cluttering our Octopus server with stale deployment targets.
Besides, this offers a glimpse at how powerful the combination of Azure Automation and Azure Event Grid can be.
For more information on Azure Event Grid, head over to the docs.

Comments
Alan Low
This looks really useful and just what I need, but one question I have is whether you’ve tried this with Scale Set VMs?
Mathieu Buisson
Hi Alan, I haven’t tried with VMs within a VM Scale Set.
But, as long as VM deletion from a Scale Set generates an event with a ‘Microsoft.Compute/virtualMachines/delete’ operation name, it will work.
Leave a Comment
Your email address will not be published. Required fields are marked *