
Deploying a production-ready Azure Kubernetes (AKS) cluster with PSAksDeployment
Introducing PSAksDeployment
Azure Kubernetes Service (AKS) makes provisioning Kubernetes clusters very easy.
Unfortunately, the examples we can find out there, be it in official documentation or blog posts, are more “Hello World!” than “real world”.
Deploying a production-ready Kubernetes cluster requires additional components and considerations, like :
- Monitoring
- Kubectl configuration
- How to deploy resources (Helm and Tiller)
- Routing requests from the outside world to services in the cluster (ingress controller)
- Issuing and managing TLS certificates for HTTPS endpoints
PSAksDeployment aims to bridge the gap between a “Hello World!” AKS cluster and a cluster on which we can run production apps.
It is an opinionated implementation, in the sense that :
- The monitoring solution is Azure Monitor (with Log Analytics)
- The ingress controller is NGINX Ingress Controller
- Management Kubernetes resources are deployed into a “management” namespace
- The solution to manage TLS certificates is cert-manager (with Let’s Encrypt)
- The ingress controller TLS certificate is propagated to other namespaces (including namespaces created at a later point), to allow ingresses in any namespace to use it, using a custom tool : secret-propagator
Installing PSAksDeployment
To use PSAksDeployment, you need :
- Windows PowerShell 5.1
- .Net Framework 4.7.2 (required by the “Az” PowerShell modules)
This means it is only supported on Windows at this point in time. I may make it work with PowerShell Core if there is a need for it.
PSAksDeployment is available on the PowerShell Gallery, so installing it is easy as :
Install-Module -Name 'PSAksDeployment' -Repository 'PSGallery'
PSAksDeployment leverages a few extra tools under the hood :
So PSAksDeployment provides the command Install-PSAksPrerequisites, which downloads and installs these tools (if they are not already installed) in a location specified via the InstallationFolder parameter, like so :
Install-PSAksPrerequisites -InstallationFolder 'C:\Tools'
If the specified installation folder is not in the PATH environment variable, it also takes care of adding it.
Note :
Be patient, the file downloads may take a while.
As soon as Install-PSAksPrerequisites completes, we can start deploying stuff.
Deploying an AKS Cluster
This is where the command Invoke-PSAksDeployment comes in.
It deploys the following :
- an Azure Kubernetes Service (AKS) instance
- an Azure Log Analytics workspace with the ContainerInsights solution
- a Public IP address for the ingress controller
- a “management” namespace
- Tiller
- NGINX Ingress Controller
- cert-manager
- a TLS certificate (to support HTTPS ingresses)
- secret-propagator
It primarily acts as an input validation and orchestration layer. Under the hood, most of the work is done by Terraform.
Due to the nature of what it does, Invoke-PSAksDeployment takes in a large number of parameters :
PS C:\> Import-Module -Name 'PSAksDeployment'
PS C:\> (Get-Command -Name 'Invoke-PSAksDeployment').Parameters.Keys
ServicePrincipalID
ServicePrincipalSecret
AzureTenantID
Subscription
ClusterName
ClusterLocation
LogAnalyticsWorkspaceLocation
KubernetesVersion
NodeCount
NodeSize
OSDiskSizeGB
MaxPodsPerNode
Environment
LetsEncryptEmail
TerraformOutputFolder
ConfigPath
You may be wondering :
What are these for ?
Which ones are mandatory ?
What is the default value ?
What are the possible values ?
We can get this information with the cmdlet help, for example :
PS C:\> Get-Help 'Invoke-PSAksDeployment' -Parameter 'ServicePrincipalID'

-ServicePrincipalID <String>
    The application ID of the Service Principal used by Terraform (and the AKS cluster) to access Azure.

    Required?                    true
    Position?                    1
    Default value
    Accept pipeline input?       false
    Accept wildcard characters?  false
But doing this for each parameter can be tedious, so there is another way to specify all inputs to Invoke-PSAksDeployment : a configuration file.
New-PSAksDeploymentConfig scaffolds this configuration file, with helpful information for each parameter :
- a description
- the data type
- valid values
- the default value
Here is an example :
PS C:\> $ScaffoldParams = @{
>>     ServicePrincipalID     = '29x1ecd3-190f-42c9-8660-088f69d121zn'
>>     ServicePrincipalSecret = 'tsWpRr6/YCxNyh8efMvjWbe5JoOiOw03xR1o9S5CLhZ='
>>     AzureTenantID          = '96v3b174-9c1p-4a5e-9177-18c3bccc87cb'
>>     Subscription           = 'DevOps'
>>     ClusterLocation        = 'North Europe'
>>     Path                   = '.\my-k8s-prod.psd1'
>> }
PS C:\> New-PSAksDeploymentConfig @ScaffoldParams
We still need to provide quite a few bits of information, but this is needed so that the tool can connect to Azure and fetch more information, like :
- Subscriptions the specified Azure Service Principal has access to
- Azure regions where AKS is available
- Kubernetes versions available in the specified region
- Azure regions where a Log Analytics workspace can be provisioned
Here is what the generated file looks like :
@{
    <#
    The name of the Azure subscription where the AKS instance (and other Azure resources) will be deployed.
    Type : String
    Valid values : "DevOps", "ANY OTHER SUBSCRIPTION WHICH CAN BE ACCESSED BY THE SERVICE PRINCIPAL"
    #>
    Subscription = ""

    <#
    The Azure region where the AKS cluster (and other Azure resources) will be deployed.
    Type : String
    Valid values : "East US", "West Europe", "Central US", "Canada Central", "Canada East", "UK South", "West US", "West US 2", "Australia East", "North Europe", "Japan East", "East US 2", "Southeast Asia", "UK West", "South India", "East Asia"
    #>
    ClusterLocation = ""

    <#
    The Azure region where the Log Analytics workspace will be deployed.
    This might not be possible to provision the Log Analytics workspace in the same region as the AKS cluster, because Log Analytics is available in a limited set of regions.
    Type : String
    Valid values : "East US", "West Europe", "Southeast Asia", "Australia Southeast", "West Central US", "Japan East", "UK South", "Central India", "Canada Central", "West US 2"
    #>
    LogAnalyticsWorkspaceLocation = ""

    <#
    The application ID of the Service Principal used by Terraform (and the AKS cluster) to access Azure.
    Type : String
    Valid values :
    #>
    ServicePrincipalID = ""

    <#
    The password of the Service Principal used by Terraform (and the AKS cluster) to access Azure.
    Type : String
    Valid values :
    #>
    ServicePrincipalSecret = ""

    <#
    The ID of the Azure AD tenant where the Terraform Service Principal (and the target subscription) live.
    Type : String
    Valid values :
    #>
    AzureTenantID = ""

    <#
    The name of the AKS cluster.
	The name of the resource group and the cluster DNS prefix are derived from this value.
    Type : String
    Valid values : The name can contain only letters, numbers, and hyphens. The name must start with a letter and must end with a letter or a number.
    #>
    ClusterName = ""

    <#
    The version of Kubernetes software running in the AKS Cluster.
    Type : String
    Valid values : "1.8.14", "1.8.15", "1.9.10", "1.9.11", "1.10.8", "1.10.9", "1.11.4", "1.11.5"
    #>
    KubernetesVersion = "1.11.5"

    <#
    The number of worker nodes in the AKS cluster.
    Type : Int32
    Valid values : Between 1 and 100.
    #>
    NodeCount = 3

    <#
    The VM size for the AKS cluster nodes.
	This is more descriptive version of Azure VM sizes, it follows a naming convention as :
	{VM Family}_{Number of vCPUs}_{Number of GB of RAM}
    Type : String
    Valid values : "B_2vCPU_8GB", "B_4vCPU_16GB", "D_2vCPU_8GB", "D_4vCPU_16GB", "D_8vCPU_32GB", "E_2vCPU_16GB", "E_4vCPU_32GB", "F_2vCPU_4GB", "F_4vCPU_8GB", "DS_2vCPU_7GB", "DS_4vCPU_14GB"
    #>
    NodeSize = "D_2vCPU_8GB"

    <#
    The OS disk size (GB) for the cluster nodes.
	If set to 0, the default osDisk size for the specified vmSize is applied.
    Type : Int32
    Valid values : Between 0 and 1024.
    #>
    OSDiskSizeGB = 30

  ...
}
(Output cut for brevity)
As we can see above, values are already set when there is a default value, otherwise, it’s an empty string.
We can populate and change the values to our needs, and when the file is ready, we can feed it to Invoke-PSAksDeployment, like so :
PS C:\> Invoke-PSAksDeployment -ConfigPath '.\my-k8s-prod.psd1'
While the deployment is in progress, there is quite a lot of logging written to the console, some of which will look very familiar to those who use Terraform.
The overall deployment duration depends on many variables, some of which pertain to the Azure infrastructure/platform.
That being said, in my experience, it takes between 20 and 40 minutes.
When it completes, we can take a look at the deployed resources in the Azure portal, but what we can see in the resource group (my-k8s-prod-rg in this case) is somewhat deceptive :

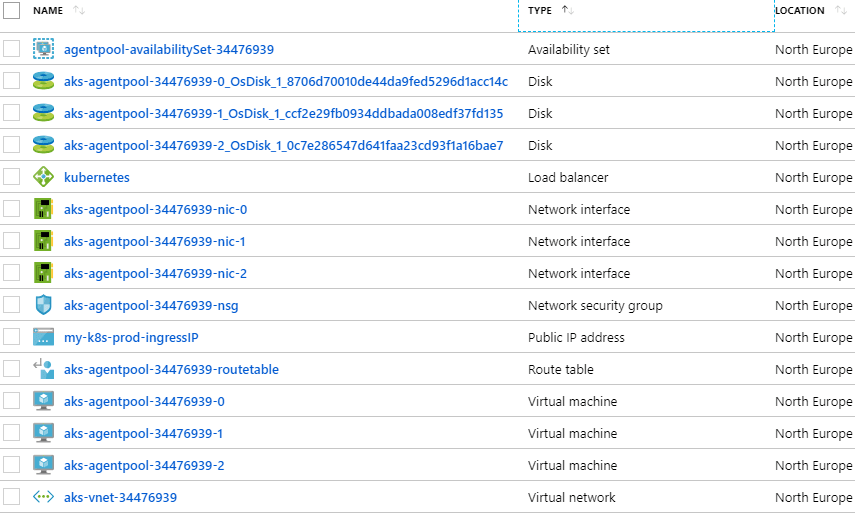
Azure AKS creates another resource group (MC_my-k8s-prod-rg_my-k8s-prod_northeurope in this case), which contains the infrastructure resources associated with the cluster : Kubernetes node VMs, virtual network, load balancer, storage, etc :
Also, the usual Kubernetes management tools are ready to work with our new cluster.
For example, we can use our trusty kubectl to list the deployments in the “management” namespace :
PS C:\> kubectl get deployment -n management
NAME                            DESIRED   CURRENT   UP-TO-DATE   AVAILABLE   AGE
cert-manager                    1         1         1            1           33m
nginx-ingress-controller        2         2         2            2           40m
nginx-ingress-default-backend   1         1         1            1           40m
secret-propagator               1         1         1            1           32m
Or use a helm command to list all Helm releases :
PS C:\> helm ls
NAME                 REVISION    UPDATED                     STATUS      CHART                   APP VERSION   NAMESPACE
cert-manager         1           Mon Jan 28 10:35:08 2019    DEPLOYED    cert-manager-v0.5.2     v0.5.2        management
cluster-issuer       1           Mon Jan 28 10:35:18 2019    DEPLOYED    cluster-issuer-0.1.0    1.0           default
nginx-ingress        1           Mon Jan 28 10:28:41 2019    DEPLOYED    nginx-ingress-1.1.5     0.21.0        management
secret-propagator    1           Mon Jan 28 10:36:32 2019    DEPLOYED    secret-propagator-0.1.0 1.0           default
Deleting an AKS Cluster
An AKS cluster deployed with Invoke-PSAksDeployment may need to be later deprovisioned.
In this case, the cmdlet Remove-PSAksDeployment automates tearing down the Azure Kubernetes Service instance and all associated resources, to stop incurring any Azure charges.
Warning :
This deletes all resources in both resource groups : the target resource group and the infrastructure resource group created by AKS.
Keep this in mind, especially if any resource(s) were added outside of PSAksDeployment’s purview.
Here is an example usage :
PS C:\> $DestroyParams = @{
>>     ServicePrincipalID     = '29x1ecd3-190f-42c9-8660-088f69d121zn'
>>     ServicePrincipalSecret = 'tsWpRr6/YCxNyh8efMvjWbe5JoOiOw03xR1o9S5CLhZ='
>>     AzureTenantID          = '96v3b174-9c1p-4a5e-9177-18c3bccc87cb'
>>     Subscription           = 'DevOps'
>>     ClusterName            = 'my-k8s-prod'
>> }
PS C:\> Remove-PSAksDeployment @DestroyParams
Zooming In On a Few Terraform Resources
Now that we know how to use PSAksDeployment, let’s take a look at a few sections of Terraform configurations which are worthy of mention/explanation.
resource "null_resource" "helm_init" {
  provisioner "local-exec" {
    command = "helm init --wait --replicas ${var.tiller_replica_count} --tiller-namespace kube-system --service-account=${kubernetes_service_account.tiller.metadata.0.name}"
  }

  depends_on = ["kubernetes_cluster_role_binding.tiller"]
}
This resource is just running a command on the local machine.
The purpose of the helm init command is to install and configure tiller (the server-side component of Helm) into the Kubernetes cluster.
After this command completes, we are ready to use Helm against our Kubernetes cluster to deploy components and applications via Helm charts.
Helm charts are essentially packages describing Kubernetes resources to deploy (pods, services, etc…) and how to deploy them. We actually use Helm charts in subsequent steps.
resource "helm_release" "nginx_ingress" {
  name      = "nginx-ingress"
  chart     = "stable/nginx-ingress"
  namespace = "${kubernetes_namespace.management.metadata.0.name}"

  // Giving Azure 10min to create a load-balancer and assign the Public IP to it
  timeout    = "600"
  depends_on = ["null_resource.helm_init"]

  values = [<<EOF
  controller:
    replicaCount: ${var.ingressctrl_replica_count}
    service:
      loadBalancerIP: "${var.ingressctrl_ip_address}"
EOF
  ]
}
The helm_release Terraform resource allows to deploy Helm charts into Kubernetes.
Here, the Helm chart being deployed is “nginx-ingress”.
The NGINX Ingress Controller is a popular solution to manage access to services running inside the cluster from the outside world.
The loadBalancerIP value is interesting :
it tells Kubernetes to create a service and expose it externally via a load-balancer. Then, Kubernetes asks the underlying cloud provider (Azure, in this case) to provision a load-balancer and attach it to the specified IP address.
The value of this IP address comes from a Public IP Azure resource which is created at an earlier step.
Sometimes, the provisioning of the Azure load-balancer takes more than 5 minutes (the default Helm timeout), this is why we set the timeout value to 600 (10 minutes).
resource "helm_release" "cert_manager" {
  name       = "cert-manager"
  chart      = "stable/cert-manager"
  // Since v0.6.0, cert-manager Helm chart doesn't provide
  // a good way of installing the cert-manager CRDs
  version    = "v0.5.2"
  namespace  = "${kubernetes_namespace.management.metadata.0.name}"
  timeout    = "540"
  depends_on = ["helm_release.nginx_ingress"]

  values = [<<EOF
  ingressShim:
    defaultIssuerName: letsencrypt-${var.letsencrypt_environment}
    defaultIssuerKind: ClusterIssuer
EOF
  ]
}
This time, we deploy the cert-manager Helm chart.
Cert-manager is a very cool tool which automates the issuance and renewal of TLS certificates needed by HTTPS-based services. The resulting certificates are ultimately stored in Kubernetes as secret resources.
cert-manager extends Kubernetes with custom resources, like : Certificate, Issuer, etc…
These CustomResourceDefinition (CRDs) are not shipped with the Helm chart anymore, which means we need to apply a separate YAML manifest prior to using cert-manager Helm chart. Besides, the URL of this manifest varies based on the cert-manager version.
So as a (hopefully temporary) workaround, we pin the cert-manager Helm chart version to the latest one which ships with the CRDs.
resource "helm_release" "cluster_issuer" {
  name       = "cluster-issuer"
  chart      = "..\\..\\Assets\\cluster-issuer"
  depends_on = ["helm_release.cert_manager"]

  values = [<<EOF
  email: ${var.letsencrypt_email_address}
  environment: ${var.letsencrypt_environment}
EOF
  ]
}
Again, we deploy a Helm chart, but this time we are not pulling the chart from the stable repository but from a local directory.
This is a custom chart to create a cluster-wide issuer resource for cert-manager.
cert-manager can talk to different certificate authorities, but in this case, we configure it to talk to Let’s Encrypt. Let’s Encrypt is easy to use, free, and suitable for production certificates.
The caveat to that is :
Let’s Encrypt certificates are only valid for 90 days, but this is not a problem here, because cert-manager takes care of renewing them automatically.
That’s pretty much it for now.
For more information about PSAksDeployment and a dive into the code, head over to the project on GitHub.
If you have any question, remark, issue, or feature request, feel free to open an issue.
Leave a Comment
Your email address will not be published. Required fields are marked *