
Using Pester to validate deployment readiness for a large number of machines
Recently, I had to roll out an upgrade of our software for a customer. The upgrade failed for about 80 client machines (out of around 400).
There was a lot of head-scratching and quite a few :
“It was working in the Test environment !”
Because we couldn’t afford more downtime, I had to develop an inelegant workaround to allow machines to upgrade.
But even so, this upgrade rollout went well over the planned maintenance window.
In short, it was a pain. And you know what ?
Pains are great learning opportunities and powerful incentives to take action. The first lesson was that there was a multitude of different causes which boiled down to inconsistently configured machines.
The second lesson was that we needed some kind of tool to validate the upgrade readiness of machines to prevent this in the future.
This tool would allow to check whether all the machines meet the prerequisites for a deployment or upgrade before rolling it out.
This should also provide a nice, visual report so that non-technical stakeholders can see :
- The overall number and percentage of machines not ready
- Which machines are ready
- Which ones are not ready
- Which prerequisites (and prerequisite categories) are met
- Which prerequisites (and prerequisite categories) are not met
The report should also allow technical stakeholders to drill down to see for a specific machine which prerequisite(s) were not met and why.
Knowing that Pester can be used to validate the operation of a system, I figured I could build a tool leveraging Pester tests to validate prerequisites.
So the result is a PowerShell module named : DeploymentReadinessChecker.
It is available on the PowerShell Gallery.
Basic usage
The requirements are :
- PowerShell 4.0 (or later)
- The Pester module should be installed on the machine from which we run DeploymentReadinessChecker
- A Pester script containing tests for the prerequisites we want to validate
- A list of computer names for the machines we want to check the prerequisites against
- Credentials to connect to all the target machines
The module comes with an example validation script : Example.Tests.ps1 and that is what we are going to use here.
For your own deployments or upgrades, you will need a validation script containing tests for your own prerequisites :
- Hardware prerequisites
- OS requirements
- Runtime or other software dependencies
- Network connectivity prerequisites
- Whatever else you need…
Here are a few examples from the first 2 Describe blocks of Example.Tests.ps1 :
Describe 'Hardware prerequisites' -Tag 'Hardware' {
    It 'Has at least 4096 MB of total RAM' {

        Invoke-Command -Session $RemoteSession {
        (Get-CimInstance -ClassName Win32_PhysicalMemory).Capacity / 1MB } |
        Should Not BeLessThan 4096
    }
}
Describe 'Networking prerequisites' -Tag 'Networking' {
    It 'Can ping the Management server by name' {

        Invoke-Command -Session $RemoteSession { Param($ManagementServerName)
        Test-Connection -ComputerName $ManagementServerName -Quiet } -ArgumentList $ManagementServerName |
        Should Be $True
    }
    It 'Can ping the Deployment server by name' {

        Invoke-Command -Session $RemoteSession { Param($DeploymentServerName)
        Test-Connection -ComputerName $DeploymentServerName -Quiet } -ArgumentList $DeploymentServerName |
        Should Be $True
    }
    It 'Has connectivity to the Management server on TCP port 80' {

        Invoke-Command -Session $RemoteSession { Param($ManagementServerName)
        (Test-NetConnection -ComputerName $ManagementServerName -CommonTCPPort HTTP).TcpTestSucceeded } -ArgumentList $ManagementServerName |
        Should Be $True
    }
    It 'Has the firewall profile set to "Domain" or "Private"' {

        Invoke-Command -Session $RemoteSession {
        $FirewallProfile = (Get-NetConnectionProfile)[0].NetworkCategory.ToString();
        $FirewallProfile -eq 'Domain' -or $FirewallProfile -eq 'Private' } |
        Should Be $True
    }
}
As we can see, it is the validation script’s responsibility to handle the remoting to the target machines.
The validation script should be located in $Module_Folder\ReadinessValidationScript\.
Also, its extension should be .Tests.ps1 because that’s what Invoke-Pester looks for.
There is no support for multiple validation scripts, so before adding your own validation script in there, rename Example.Tests.ps1 by changing its extension to something else than .Tests.ps1.
This is to ensure that the example script is ignored by Invoke-Pester.
Update :
I added support for multiple validation scripts.
Test-DeploymentReadiness can only invoke 1 validation script at a time, but if there is more than 1, a dynamic ValidationScript parameter is made available to specify the name of the validation script.
It is highly recommended to group related tests into distinct and meaningful Describe blocks because, as we’ll see later on, some items in the report are displayed on a per-Describe block basis.
Optionally, Describe blocks can have tags and the tool can use these tags to include or exclude some tests, just like Invoke-Pester does.
The module contains a single cmdlet : Test-DeploymentReadiness.
Our computer names list can be fed to the ComputerName parameter at the command line, from a file, or via pipeline input.
For example, for a single computer, this could look like :
C:\> $Cred = Get-Credential
C:\> Test-DeploymentReadiness -ComputerName 'Computer1' -Credential $Cred -OutputPath $env:USERPROFILE\Desktop\Readiness
We get the console output from Invoke-Pester for each target machine specified via the ComputerName parameter and a little bit more text at the end.
Additionally, it outputs an object to the pipeline : a FileInfo object for the Index.html of the report. That way, if we want instant gratification, we can directly open the report in our default browser by piping the output to Invoke-Item.
Output files are generated in the current directory by default, or in the directory specified via the OutputPath parameter.
Invoke-Pester generates one XML test result file per target machine and ReportUnit.exe generates one HTML report per target machine and the overall report Index.html.
To view the report, we only need to open the Index.html because it has links to machine-specific files if we want to drill down to the per-machine reports.
Filtering the tests using tags
As said earlier, all the Pester tests representing the prerequisites should be in a single validation script, so we can potentially end up with a script containing a very large number of tests.
To make this more flexible, we can group tests related to the same topic, purpose, or component into distinct Describe blocks and give these Describe blocks some tags.
Then, Test-DeploymentReadiness can include only the tests contained in the Describe blocks which have the tag(s) specified via the Tag parameter, like so :
C:\> $Cred = Get-Credential
C:\> $Path = "$env:USERPROFILE\Desktop\Readiness"
C:\> Test-DeploymentReadiness -ComputerName 'Computer1' -Credential $Cred -Tag 'OS' -OutputPath $Path
Similarly, we can exclude the tests contained in the Describe blocks which have the tag(s) specified via the ExcludeTag parameter.
Passing parameters to the validation script
It is more than likely that the Pester-based validation script takes parameters, especially since it remotes into target machines, so it may need a ComputerName and a Credential parameter.
If your validation script has parameter names matching ComputerName or Credential, then Test-DeploymentReadiness does a bit of work for you.
It passes 1 computer at a time to the validation script’s ComputerName parameter.
If the validation script has a Credential parameter, Test-DeploymentReadiness passes the value of its own Credential parameter to the validation script.
Cool, but what about any other parameters ?
That’s where the TestParameters parameter comes in.
The parameter names and values can be passed as a hashtable to the TestParameters parameter of Test-DeploymentReadiness. Then, Test-DeploymentReadiness passes these into the Script parameter of Invoke-Pester, when calling the validation script.
The example validation script Example.Tests.ps1 takes quite a few parameters, among them are DeploymentServerName and ManagementServerName.
We can pass values to these 2 parameters, like so :
C:\> $TestParameters = @{ DeploymentServerName = 'DeplServer1'
 >>                     ManagementServerName = 'Mgmtserver1'
}
C:\> 'Computer1','Computer2','Computer3','Computer4','Computer5' |
Test-DeploymentReadiness -Credential $Cred -OutputPath $Path -TestParameters $TestParameters
The Reports
As mentioned earlier, we only need to open the generated Index.html and this opens the overview report.
After running the above command, here is what this looks like :
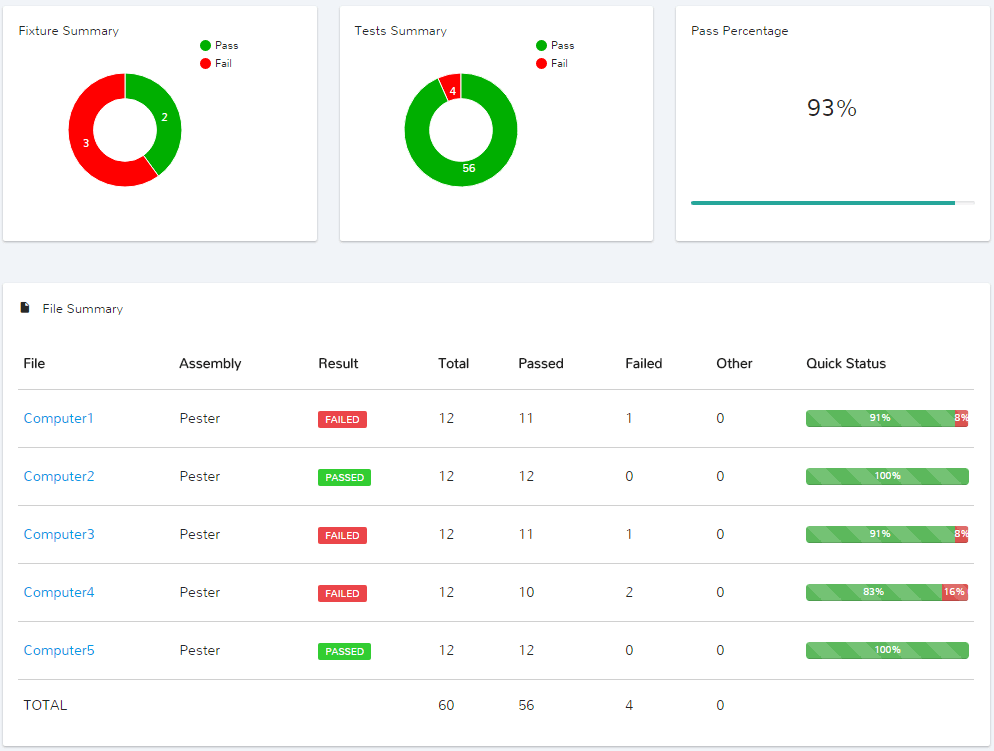
Fixture summary gives us the number of ready machines and not-so-ready machines, whereas the Pass percentage gives us the percentage of machines which are ready.
We can see that Computer4 is the only machine which failed more than 1 prerequisite.
We can drill down into this machine’s details by clicking the Computer4 link :
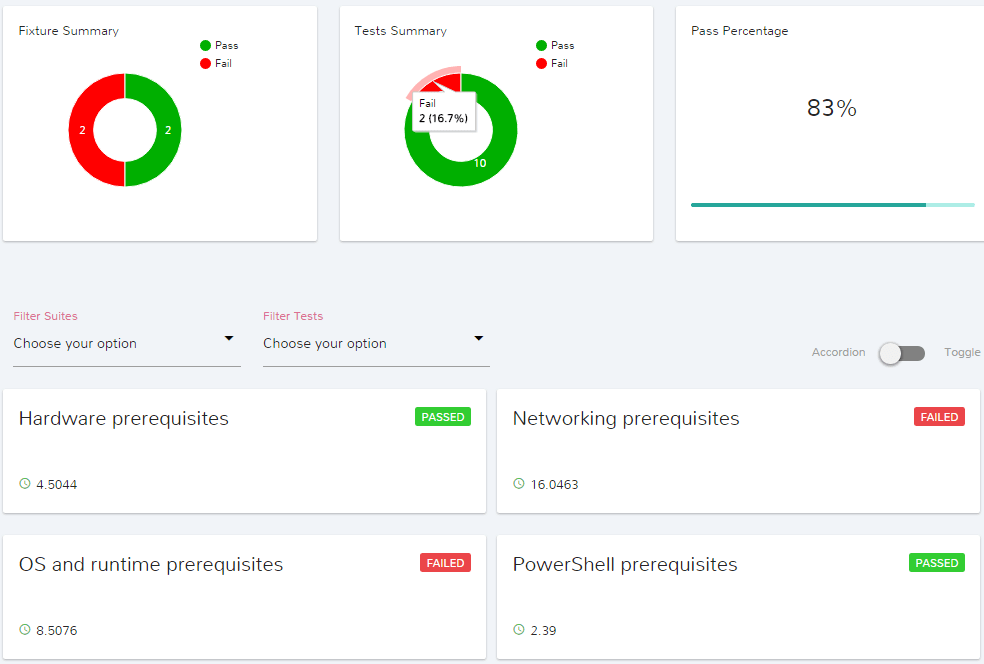
We can clearly see 4 distinct prerequisite categories, which corresponds with Describe blocks in our validation script.
Here, Fixture summary tells us which prerequisite categories contained at least one failed prerequisite(s).
Let’s check which Networking prerequisite(s) were not met by clicking on Networking prerequisites :
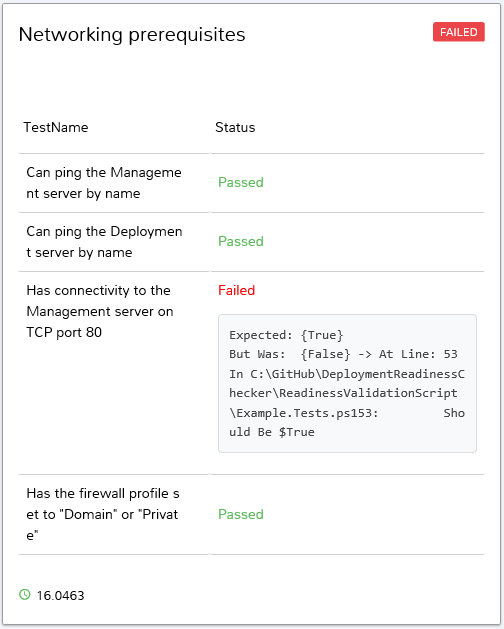
So now, we have a better idea of what the issue is.
The actual usefulness of the Pester error message will depend on how the test is written.
Pretty neat, huh ? I can see this saving me hours and hours of work, and considerably reduce the maintenance windows in future deployments and upgrades.
If this tool doesn’t exactly fit your needs or if you think of an enhancement, the code is on GitHub, feel free to submit an issue, or even better, fork it and improve it.

Comments
Pierrick
Awesome work. I would be glad to contribute
Mathieu Buisson
Thanks Pierrick.
Absolutely, if you want to contribute an idea you can submit an issue on the GitHub project.
If you want to contribute code, you can submit a pull request.
That would be awesome .
Leave a Comment
Your email address will not be published. Required fields are marked *